


 Things You'll Need
 1/2-inch pressed wood, Indoor-open air covering, Caulking, Wood trim, 2-by-6-inch sheets,
2-by-8 inch, Outside siding, Fiberglass protection, Drywall, Electrical wiring, Electrical outlets, Joint compound, Craftsman's square, Paint, Window boards, Electric screwdriver, Outside entryway, Glass-framed inside entryway, 3-inch treated steel screws, Light installations, Roof fans
1
Check the establishment of the deck first and make fundamental fixes if the deck is concrete. Protect the underside of a wooden deck if the crawlspace is available. In any case seal the highest point of the deck flooring with 1/2-inch compressed wood nailed into place and secured by indoor-open air covering. Slice the compressed wood and covering to fit flush with the border of the room. Include caulking and wood trim around the edges of the floor to help seal out outside air.
2
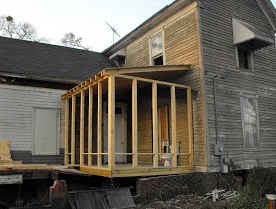
Edge the sunroom to have glass boards around the dividers. Plan to work in the base of each divider 24-inches high with strong materials. Plan the space to have dividers of windows two feet off the floor right to the roof. Utilize 2-by-6-inch sheets to make divider confining with studs on 16-inch focuses and openings for windows. Expel existing sections as the encircling assimilates the rooftop's weight. Nail outside siding on the last 24 creeps of the deck to be completely encased.
3
Build the edge for the rooftop with two-by-fours or two-by-sixes. Spread with pressed wood and include shingling. Associate the rooftop casing to the casing of the divider with sections. .
4
Protect and finish the inside of the lower divider segments. Staple move type fiberglass protection between studs on lower dividers. Run electrical wiring all through the room in the last 24 crawls to be unequivocally encased. Introduce electrical outlets before covering those areas of the dividers with drywall. Utilize joint compound to complete the drywall before painting.
5
Introduce windows for the sun room. Square up divider confining to get glass boards or premade windows. Utilize a craftsman's square to guarantee 90-degree points in all corners for windows. Include shims of wood under completed sheets to exactly shape casings to help glass boards or windows. Utilize a few laborers to lift the windows into place. Join windows into outlines utilizing an electric screwdriver. Caulk around all window edge zones, both inside the room and outside.
6
Include completing contacts. Introduce a premade exit entryway for the sunroom. Secure to structure with three-inch treated steel screws. Ensure opening and shutting the entryway won't container close by windows. Supplant an inside entryway driving into the sunroom from inside the house, if necessary. Consider including an entryway with glass boards to give added light to the home's inside. Introduce electric lights overhead and roof fans whenever wanted.